Making a earthworm observatory is a great way to see for yourself what earthworms do and how they might change ecosystems when they invade. You can set up a demonstration observatory in your classroom or nature center, or students can use small observatories to conduct their own experiments!
Download a lesson plan of the activity described below that is aligned to content standards for: 4-6th grades, 7-8th grades, 9-12th grades
- Download a short powerpoint presentation you can use with this lesson (1.8MB).
- Download a short, interactive story you can use to introduce this lesson.
- Download a glossary of terms you might find helpful for this and other lessons.
Ecological Concepts
- Earthworms ingest organic material (sometimes along with soil) and microbes in their gut break the organic material, releasing nutrients in the earthworm gut which are absorbed by the earthworm so it can live, grow, and reproduce.
- This behavior leads to removal of surface litter and the deposition of earthworm cast material (poop) in the soil. This results in the formation of a thick layer of “black dirt” which is made up of earthworm cast material.
- The new layer of earthworm cast material (black dirt) has different properties than non-earthworm worked soil and organic material.
- density (grams of soil/cm3) often increases
- the percent of organic material in soil often increases (grams of carbon/grams of soil)
- nutrient turnover increases (nitrogen and phosphorous)
Demonstration Observatory
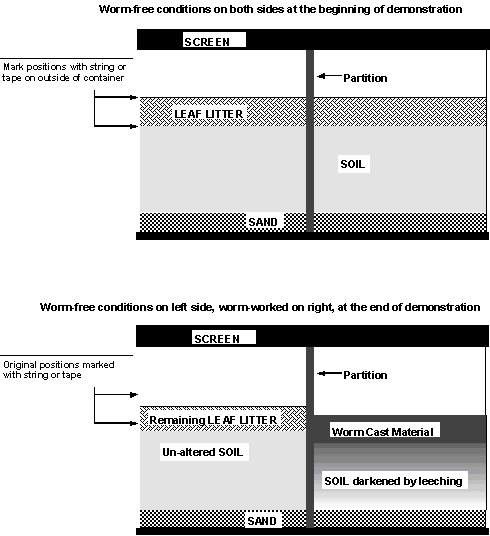
The objective of this demonstration is to illustrate what earthworms do and how they affect soil conditions. We do this by setting up an experiment where we simulate a natural soil system and then add worms to one half but not the other. We then observe the demonstration for changes (See Figure 1). This demonstration can be used as an organizing point for many lessons in life science (animals, soil, ecology, ecosystems, etc.), science as inquiry, and has many potential links with math, chemistry and even art and writing (a few suggested lessons are noted with *).
The demonstration described here is intended to approximately replicate the soil layering (called soil horizons) seen in earthworm-free hardwood forests of the Great Lakes region, and the affects that earthworms can have on this soil structure.
Materials Needed
- The container
- 5 gallon aquarium, recommended.
(anything larger gets very heavy once you fill it with soil) - A tank divider made of Plexiglas, a scrap piece of wood, rigid insulation (my preference) or some other impenetrable material, cut to fit snuggly.
- Silicone caulk, epoxy or some other material used to seal around the divider.
- A fitted lid of some kind, a snap on screen lid for an aquarium works great.
- 5 gallon aquarium, recommended.
- The soil layers
- Sand – bottom 2 inches or so (solely for drainage)
- Soil – about a 4-6 inch layer of a light colored loamy soil (beige, red, any other color but black so the change to black earthworm cast material is evident) A very dark color indicates that the soil contains lots of organic compounds, that's why earthworm cast material is black.
- Leaf Litter – on top put about a 3 inch layer of crushed, dried leaves. Hardwood tree litter is best. Maple, Aspen, Birch or Basswood leaves are best, use Oak only as a last resort since they are less palatable to worms. Last years dried leaves work the best. If you collect fresh leaves, dry them completely until they crumble easily. Crush the leaves by hand until they are broken into small bits (1/8 – 1/2 inch) but not powdery. Some larger bits are fine too.
- Note: All of the soil and litter components must be completely earthworm free. Sift soil to get rid of any worms that may be there. Use only very dry leaf litter since wet litter often contains worms. If you can spread the soil and litter out on a tarp in a thin layer, in the blazing sun for a few days or a week to really cook it, this will kill or drive off any tiny worms present.
- A related math exercise: have the kids calculate how much of each material you will need based on the volume of the container and the desired thickness of each layer.
- The Worms
Any kind of earthworm will work. Different species of worms will have different affects due to their ecology and feeding habits (see “earthworm type” handout). Some live only in the litter (small-bodied red worms), some live only in the soil (larger whitish - gray worms) but the night crawler (large-bodied red earthworm) goes everywhere and, being so large, they eat a lot. For the fastest and most dramatic results, use either leaf worms (Lumbricus rubellus) or night crawlers (Lumbricus terrestris), both of which can be found in local bait shops. If you choose to dig you own worms and see what you think may be several different types of worms, just pick one of the types and use it.For one side of the container (remember you are leaving one side earthworm free!) use enough worms to equal 200-400 individuals per square meter…
A related math exercise: have students calculate how many worms you wouldneed for the container to achieve the desired density of worms.- Leaf worms (L. rubellus) about 15-20 worms
- Night crawlers (L. terrestris) about 6-10 worms
- Red-Wigglers (Eisenia fetida) or Angle worms (Aporrectodea species) about 10-15 worms
Assembling Everything
- Divide the tank into two equal halves. Be sure the divider is tightly fitted and sealed (silicone caulk, epoxy glue, etc.) to prevent movement of worms from one side to the other. Tiny juvenile worms can move through any fine mesh and even big worms can get through very tiny spaces. Be sure the lid fits snuggly down on the divider to prevent worms from crawling over (yes, they will do this!). If you are using a screen lid be sure the divider fits snugly to the screen.
- Build the layers of soil from the bottom up…smoothing each as you go so they are level and equal on both sides.
- Sand goes on the bottom. This is primarily for drainage so the upper layers do not get overly saturated.
- Loamy soil simulates the thickest and deepest layer of soil generally found in rich, mesic hardwood forests. This layer is often called the “mineral soil.”
- Leaf litter simulates the forest floor or “duff” layer of earthworm-free hardwood forests. In a natural forest, this layer would be full of insects, roots, fungal hyphae and hordes of other organisms. But for our purposes, this simulated duff layer does a great job.
- If the soil and litter are very dry, sprinkle water slowly over the whole demonstration to moisten the upper layers with a minimal amount of flow through to the sand. Maintain moisture levels throughout the run of the experiment since earthworms will become inactive when conditions are to extreme (to dry, hot or cold). They can live in saturated conditions but they do not prefer it. FYI-worms do not come up during rainstorms to avoid drowning. They do so because it is an opportunity to disperse when surface conditions are moist and cool.
- Use tape or string to mark the top of each layer on the outside of the aquarium (these will change during the demonstration and if you don't mark them it's not as obvious).
- Add worms. They will find their way down, no need to bury them, just thrown them in on top of everything! Be sure to make note of how many you put in and the date.
- Wait, keep observations. If you used night crawlers, you should see obvious activity on that side within a few days or weeks. After a month or more, the differences between the earthworm-free and the earthworm populated sides will be obvious. Some suggestions on observations…a) measure changes in the thickness and height of the different layers using the reference markings you placed on the outside.b) note changes in color or texture to each layer.c) note which layers you see the earthworms in (they should move along the glass every once in a while, leaving burrows, so you can see where they have been).d) general descriptive observations that are of interest to the students.
Small Observatories
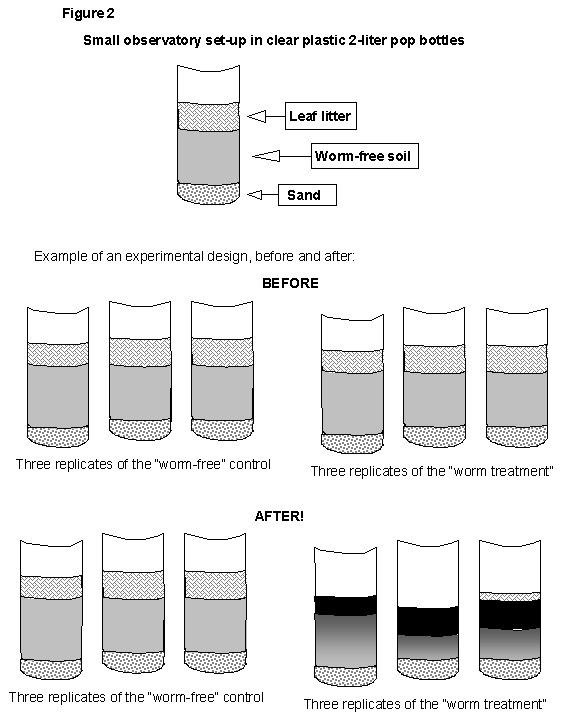
Using the same layers as in the demonstration observatory, you can use clear 2 liter plastic pop bottles to make small observatories, which are ideal for small experiments because you can make replicates for different treatments! (See Figure 2)
Options for Treatments Might Be:
- Use different species of worms to see how they differ in their affects.
- Use different types of leaf litter (keeping the worms species the same) to see which the worms eat fastest (ie. maple vs. oak, or maple vs. pine).
Scientific methodology
Using either the demonstration observatory or the small observatories is a great opportunity to introduce “the scientific method” and the concepts of an experimental “control,” experimental “treatments,” and “replicates.”
The basic idea is that all the observatories are set up exactly the same. Then, some get no treatment (the controls) and some get a “treatment.” For example earthworm-free (control) vs. worms added (treatment). The control is required to understand what would have happened if the worms weren't present. For example, the soil layers in the experiment may settle. How much is natural and how much is due to the worms? Without the control we might assume that all settling in the container is due to earthworm activity when that may only be part of the answer. Conversely, if the container without worms does not settle and the one with the worms does, we can probably conclude it was due to the worms.
Of course, with only one control and one experimental set-up, we can't always be so confident that the difference we see is the result of our treatment. Since some unknown factors may have affected our results. But, if we “replicate” the experiment and get the same results in all (or most) of them, then we can say with confidence that the differences we observed were real.
It is very important when using an experimental design with controls and/or replicates that all of the set-ups get exactly the same treatment (ie. water, light, temperature, etc.) so that we are confident that the only difference between our controls and our experimental set-ups is the variable we are testing. However, weird things always happen and when they do it's an opportunity to perhaps learn something unexpected.
I think it was Isaac Asimov that said “the greatest thing to hear in the laboratory is not eureka!, but, humm, that's funny.”
Additional Observational Opportunities
-
Calculate earthworm growth rates. Weigh the worms and the leaf litter before you put them in the demonstration. Note whether or not the worms have a clitellum (light colored collar or band around their body, near the head). This indicates that the earthworm is sexually mature and may produce cocoons and/or young during the run of the experiment.
Then, after a month or more, you can take the demonstration apart and sift out the worms. Be sure to watch for tiny white juvenile worms! Have students count and weigh the worms and the remaining litter. Compare this to what you put in. You can then calculate earthworm growth rates, reproduction rates (if there are juveniles), etc. and correlate those changes to the changes in mass of the litter.
-
Make measurements of pH and various nutrients in the different layers at the beginning of the experiment and then in each layer on each side at the end of the experiment (inexpensive test kits are available through many greenhouse or garden supply stores). Compare and contrast the changes in the earthworm-free versus earthworm wormed treatment.
-
To look at possible nutrient losses from leaching as a result of earthworm activity, put small drain holes in the bottom of your containers. Cover these holes with a very fine screen or landscape cloth so water can get through but earthworms can't. Then assemble the layers as described above. Have a separate catch basin under each container. Collect the water (leachate) that drains through at different time intervals during the experiment. Water both sides of the demonstration equally and at a rate that produces small amounts of leachate (maybe a cup a week?). Be sure to sprinkle water in slowly so it does not run straight through and you are actually collecting water (leachate) that slowly moves through the soil after having a chance to interact with the soil particles (hours to days). If you don't get any leachate from either side after the first few weeks, gradually increase the amount of water added to the demonstration until you get some leaching.
Measure the relative amount of leachate, the pH and the nutrient content of the leachate (inexpensive test kits are available through many greenhouse or garden supply stores). Compare the results of the control vs. the earthworm treatment. Don't be surprised if the two sides produce different amounts of leachate when you put the same amount of water in on each side. Earthworm burrows conduct water more rapidly through the soil horizon than soils without burrows. The nitrogen in earthworm casts is in a form that is more easily leached from the soil than the nitrogen in an intact litter layers.
Consider what the implication might be for the long term nutrient budget of a forest with and without worms based on the results of this experiment. For example, the average nitrogen content of some hardwood forests is 65 kg / hectare (58 lbs / acre). Lets assume that in earthworm free conditions nitrogen loss rates due to leaching are equal to nitrogen added to the system by fixation (estimated to be about 10% of the total pool annually) so there is no net change over time in the amount of nitrogen in the system. If earthworms increase the nitrogen content of the leachate (outputs) by, say 10% or 20% a year. Then how much nitrogen would be lost from the system in a decade and is that a significant amount?
Well, the current loss rate is 6.5 kg / hectare (5.8 lbs. / acres) per year. Ten percent of that amount is .65 kg / hectare (.58 lbs. / acres) and 20% is 1.3 kg / hectare (1.16 lbs. / acres) per year. Over a decade, that represents 6.5 kg / hectare (5.8 lbs. / acres) at the 10% level, or 13 kg / hectare (11.6 lbs. / acres) at the 20% level, of nitrogen lost from the system leaving a total of 58.5 kg / hectare (52.2 lbs. / acres) or 52 kg / hectare (46.4 lbs. / acre), respectively. At this rate of loss, in one or two decades enough nitrogen will have been lost from the system to limit the viability of many hardwood tree species, favoring conifer tree species which grow more slowly and have lower nitrogen content in their needles than do hardwood leaves. This is only one of many possible examples.
With a roll of the die, students simulate the movement of nutrients in a forest ecosystem both before and after earthworms invade to see how & why change can occur in ecosystems as a result of exotic species invasion.
Download a lesson plan of the activity described below that is aligned to content standards for... K-3 grades, 4-6th grades, 7-8th grades, 9-12th grades
- Download a short powerpoint presentation you can use with these lessons (1.8MB).
- Download a short, interactive story you can use to introduce these lessons.
- Download a glossary of terms you might find helpful for this and other lessons.
Grade Level
Upper Elementary, Middle School (adaptable for older students)
Duration
Preparation time: 50 minutes Activity time: one or two 50 minute periods
Setting
A large room of playing field
Materials
- 5 large sheets of paper
- copies of the “Forest Ecosystem Tables” and “Game Tiles”
- markers, scissors & tape
- 9 boxes, about 4-6 inches on each side. (Boxes are used to make dice for the game. Gift boxes for coffee mugs are a good size or ask at your local mailing outlet.) There will be 1 die (box) at each station. The labels for the sides of each die are listed in the “Forest Ecosystem Table”. These labels represent the options for pathways that nutrients and energy can following in the ecosystem.
- a bell, whistle or some kind of sound maker (optional)
- download game instructions (155 KB pdf)
- download game tiles - earthworm free conditions (449 KB pdf)
- download game tiles - earthworm invaded conditions (471 KB pdf)
Objectives
Students will:
- Understand the basic components of a forest ecosystem
- Describe the movements of nutrients in that ecosystem
- Identify changes that can occur with earthworm invasion
Background
The movement of nutrients from one part of an ecosystem to another is critically important in determining what an ecosystem looks like. There are lots of processes that make this flow of nutrients possible and by role-playing a nutrient moving through the ecosystem, students begin to conceptualize how these complex systems work.
Scientists use “ecosystem models” to help them understand how an ecosystem works. Every ecosystem is composed of component parts. When building a model ecosystem it is best to start simply with general compartments like “trees, soil, animals, etc”. After you learn what you can from your simple model you might discover a question that needs an even more realistic model. Then you might choose to create a slightly more detailed model. For example, our model is ideal for looking at general nutrient flow patterns for this ecosystem. But it can’t tell us anything about the kinds of trees we would expect to find there. So, then we might divide the “tree” component up into “sugar maple”, “paper birch” and “basswood” components. If the rates of nutrient flow are different for the different tree species then we will see the result when we play with our slightly more complex model. If you build a model in small steps, making it only as complex as you need to answer the question at hand then you won’t get lost in a lot of confusing details.
In this game, the students will create a simple forest ecosystem model. Since there are no native earthworms in Minnesota our model doesn’t have any either. Once students play with this system and understand how nutrients flow in it, then we add earthworms. Students can see how the changes caused by earthworms (or any exotic species) can change the rules of the ecosystem game and therefore, the ecosystem itself.
Important Concepts
Nutrients are the molecules that are needed to make plant & animal cells that together make the parts of plants and animals like leaves, muscle, etc. The some nutrients are less abundant than others or are needed in large quantities. Most plants need a lot of nitrogen and phosphorus to grow. If plants don’t get enough of one of these limiting nutrients they may not grow as fast as they would if they had plenty of that nutrient. That’s why farmers fertilize corn fields.
Earthworms change nutrient cycling in the forest by increasing the rate at which litter disappears.
Now, there are lots of nutrients in the forest floor but it is often in the form of leaves and twigs which plant roots can’t absorb. In order for those nutrients to get to plant roots the nutrients that make up those dry leaves have to be converted into a form that plant roots can absorb (ammonium, nitrite or nitrate are the three most common forms that plants can use). In a earthworm-free forest, bacteria & fungi do the converting. It is a slow process, and the plant roots quickly absorb what is released as decomposition occurs. When earthworms invade they don't “create” more nutrients, but they increase the rate of decomposition so that the nutrients that were tied up in the dry leaves and twigs get converted to available forms really quickly. They do this in two ways. First, earthworms break up the litter into tiny pieces. Second, the earthworm mixes the leaf material with lots of bacteria as it passes through its gut. Then the bacteria do their job of conversion but they can do it a lot faster with the help of the earthworm. Imagine eating a tootsie roll sucker and your favorite part is the chewy center. To get to the chewy center, you would have to eat through the hard candy exterior. Bacteria prefer the "center" of the leaf litter (sugars and carbohydrates) but first have to get through the fiber (lignin and cellulose). If you imagine licking your way to the center of a tootsie roll, it would be much slower than biting through the hard candy exterior. Likewise, it takes time for bacteria to get through the fiber all by themselves. But, when earthworms are part of the system. Earthworms act as the teeth and expose the sugars and carbohydrates to the bacteria, allowing for a relatively quick breakdown of the litter compared to bacteria consuming the litter alone. The end result is leaf litter will be consumed at a rate faster than it is produced.
Producing lots of nutrients quickly sounds like a good thing, right? Well, if there is more nutrient available than the plants can take up, they can be washed away or leached when it rains. That’s because ammonium, nitrate & nitrite can get absorbed by water molecules as well as plant roots. Two things increase the likelihood of nutrient leaching. First, there are not enough plants or root systems to absorb the amount of nutrients available. Second, with all of those earthworm burrows, water can wash the dissolved nutrients down through the soil, below the plant roots or out into rivers and streams. Nutrients that would have been cycled within the hardwood forest ecosystem can either be lost underground or transferred out to another ecosystem. Leaching could also occur in earthworm-free forests because the same leachable forms of nutrients are being produced. But leaching rarely occurs because of the slow release by bacteria & fungi and the dense fine roots in the forest floor take them as fast as they are produced.
A native species is basically a species that naturally grew or existed in a particular location before humans began influencing the landscape in that spot. So, an exotic species is basically a species that did not grow or exist in a particular location before humans brought it there (either intentionally or unintentionally). Not all exotic species are bad. In fact, less than 10% of all exotic species have any impacts and even fewer have really big negative affects.
Important Concepts (continued)
Scientists are still trying to figure out exactly why some species have big affects and some don’t. But, many of the ones that do have big impacts are species that affect ecosystem processes like nutrient cycling.
So, why can’t the native hardwood forest plants just grow in earthworm worked soil? After all, there are lots of nutrients! Well, scientist are still working on figuring out the answers to that question but here are some theories…
- Many of the plants that grow in sugar maple forests are very finicky plants. They don’t have seeds like the ones that you buy in the hardware store and plant in your gardens. These seeds have very complex germination and seed dormancy requirements. Many of them take 2-3 years, and several freeze thaw cycles to break seed dormancy and fully germinate. During that time, they must be protected from predation, drying out and freezing, which the forest floor does very well. When the worms remove the forest floor it changes the seeds environment in big ways.
- In earthworm-free forests, most of these plants root almost exclusively in the forest floor, since that’s where most of the nutrients are. When worms invade they eat the forest floor out from under the plants which is a major disturbance resulting in lots of plant mortality.
- The changes that result from earthworm invasion may also affect other parts of the forest ecosystem in ways we haven’t yet been able to document yet. Asking questions and then trying to find out the answers is what scientists do and most of the time we don’t know the answer ahead of time. We make educated guesses (hypotheses) and then go out and design studies to help us answer those questions.
Procedure
Warm-up
Ask students to brainstorm and identify the different parts of a forested ecosystem and how nutrients and energy move through that system. Write their responses on the board.
Activity
- Tell students they are going to become a nutrient molecule moving through the forest ecosystem. They will start in a earthworm-free ecosystem and then change to a earthworm-invaded one to see how things change.
- Categorize the places a nutrient can move through into 5 stations: Trees, Understory Plants, Animals, Forest Floor and Soil. Write these names on a large piece of paper put them around the room or field (students may illustrate station labels).
- Assign an even number of students to each station. Have the students identify the different places their nutrient molecule can go from that station in the forest ecosystem. Discuss the conditions that cause or allow the nutrient to move. The fact that the Soil and Forest Floor are separate stations is confusing at first. Explain that when thinking about nutrient flow in a earthworm-free forest ecosystem that MOST of the nutrient is tied up in the organic material (leaves, twigs, wood, animals, etc.) very little is actually in the soil (which is mostly composed of weathered minerals). Explain that where they can move depends on the form of the nutrient. A nutrient can’t go directly from a animal to a tree because the roots can’t absorb animal tissue. The animal has to go to the forest floor and be broken down by bacteria and THEN can go to the trees. Sometimes the molecule won’t go anywhere. After students have come up with lists, have each group share their work.
- Give the students the appropriate die for each earthworm-free station. The students can check to see if they covered all the places the nutrient can go. The Forest Ecosystem Table gives an explanation of movements for each station.
- Students should discuss the form in which molecules move from one location to another. For the plants, everything must come from the forest floor because it needs to be in an absorbable form. But animals can take from plants directly by eating them. Most of the movement will flow through the Forest Floor compartment because that’s where nutrient transformations occurs.
- Tell students they will be demonstrating nutrients movement from one location to another. In this game, a roll of the die determines where the nutrient molecule will go. Students line up behind the die at their station. Students roll the die and go to the location indicated by the label facing up. If they roll STAY, they move to the back of the line. When students arrive at the next station, they get in line. When they reach the front of the line, they roll the die and move to the next station (or STAY).
- Students should keep track of their movements. This can be done by having them keep a journal or a notepad to record each move they make, including STAYS. Another approach has half of the class playing the game and the other half watches. Onlookers can be assigned to track movements of their classmates. In the next round the onlookers play the game and the other half of the class can record their movements.
- Tell the students the game will begin and end at the sound of the bell (or buzzer or whistle). Begin the earthworm-free part of the game!
- Let the students play the game for 15-20 minutes, or until you start to see patterns develop where students (nutrients) are beginning to cluster. Blow the whistle to stop the earthworm-free round. Ask the student to discuss when nutrients flow and what patterns they are seeing as they move through the game. Where do they (as nutrients) spend a lot of their time?
Switching to WORM-INVADED
- Tell the students that now earthworms are going to invade this ecosystem and they will play the game just as they did in the earthworm-free round.
- Ask students to brainstorm on how this might change how nutrients move through the ecosystem. Explain that earthworms eat the Forest Floor and mix it into the Soil compartment in the form of cast material (earthworm poop).
- Replace the earthworm-free station dice with the earthworm-invaded station dice (only the tree dice remains the same). Have students see if they predicted all of the changes. If a student rolls leach at the soil station they leave the game and stand on the side until it is completed.
- Play the earthworm-invaded round of the game! Have students continue to record their movements. Have them discuss how the patterns of nutrient flow changed as a result of earthworm invasion and how that might change what lives & grows in the ecosystem. What might be the long term implications of the introduction of leaching into a system that previously had no leaching?
Wrap-Up
Have students use their travel record to write stories about the places the nutrient molecule has been. They should include a description of what conditions were necessary for the nutrient to move from one station to the next. Discuss the cycling that took place during the game (that is, if any student returned to the same station).
Game Alternatives
To even more clearly bring home how nutrients will accumulate in different parts of the ecosystem you may want to have the kids move tootsie rolls (representing nutrient packets) from each station as they move. Start with 10 or 20 Hershey Kisses at each station (using a different color for each station gives a nice visual of how things flow between stations). As each student moves to another station they take one Hershey Kiss (nutrient packet) with them and deposit it there. As the game progresses you will quickly see an accumulation on the forest floor when earthworm free and then a shift to soil when earthworm worked.
You could spread the playing of the game out over many days or even weeks using the Hershey Kisses as nutrient packets, with the stations spread out around the room. Every day, and for each class period, the students make one move. Over many days or weeks the students can monitor the accumulations and changes in where nutrients are in the ecosystem. This strategy could include students from multiple class periods and provides a more realistic time step for nutrient movements. The tootsie rolls give students the opportunity to track the changes that happen in their absence (not unlike how scientists measure such things in the field – though we don’t use Hershey Kisses).
Extensions
Have student compare the movement of nutrients in other types of ecosystems like prairies, suburban woodlots and urban areas. They can adapt the game by creating new faces for the die for the new ecosystem types and the different conditions that exist in each. Students can also investigate how human influences can move through the ecosystem. For example, if you were to fertilize the ecosystem how would those additional nutrients move? Will there be enough plant material to take it up or will it run off or leach away?
In this game we treated all worms as the same, but in reality different worms have different habits and ecological niches (see the website for details). Students can discuss how the affects of worms might be different with different species or ecological groups. For example, the litter dwelling species may directly affect the plants because they eat the forest floor where the plants are rooted. The soil dwelling species may not have direct affects on the plants, because they don’t eat the forest floor, but they might increase leaching more because they create deep burrows.
Forest Ecosystem Table 1: Earthworm-Free Conditions
| Station | Die side labels | Explanation |
| Trees | 4 sides trees (stay) | If a nutrient gets put into the trunk or limbs of a tree, it can stay there for a very long time |
| 2 sides forest floor | If a nutrient gets put into a leaf it returns to the forest floor at the end of the year and there are LOTS of leaves. So, a lot of nutrients move from the trees to the forest floor every year. | |
| Understory | 2 sides understory(stay) | If a nutrient gets put into the roots or stems of a perennial plant it can stay there for many years. |
| 2 sides forest floor | If a nutrient gets put into the leaf of a plant, then it goes to the forest floor at the end of the year. | |
| 2 sides animal | A plant, or part of a plant, might be eaten by an animal. | |
| Animals | 3 sides animals (stay) | If a nutrient gets put into an animal it can stay in that animal as muscle or bone for a long time OR it can get moved to another animal if a small animal gets eaten by a bigger one. Either way the nutrient stays in the animal box. |
| 3 sides forest floor | When an animal defecates or dies it transfers those nutrients to the forest floor. | |
| Forest Floor | 2 sides forest floor(stay) | If a nutrient finds it’s way to the forest floor as a leaf or dead animal, it will stay there for some period of time until it changes into a form that plant roots can take up. In a earthworm-free forest the leaves, twigs and other stuff that make up the forest floor are broken down by fungi and bacteria which is a very slow process, so things accumulate and nutrients are released slowly. |
| 2 sides understory | Understory plants root almost exclusively in the forest, so they take up available nutrients that are there. | |
| 1 side trees | The fine roots of trees also take up nutrients from the forest floor. | |
| 1 side soil | A small amount of nutrient leaches into the soil beneath. | |
| Soil | 2 sides soil (stay) | Some nutrients get bound up with soil particles and stay there. |
| 1 side tree | A few tree roots that are capable of taking up nutrients grow here (most of the roots in soil are for anchoring & taking up water). | |
| 3 sides forest floor | Fungi & bacteria take up nutrients & move them back to the forest floor to help break down the fresh litter that accumulates there. |
Forest Ecosystem Table 2: Earthworm-invaded Conditions
| Station | Die side labels | Explanation |
| Trees | same as Table 1 |
Trees are the one part of the forest that does not show obvious changes following earthworm invasion. However, the long term impacts are yet to be fully appreciated. |
| Understory | same as Table 1 |
The number of plant species and abundance has changed, so the image does too |
| Animals | same as Table 1 |
The small mammal population changes from small shrews and red-backed voles to mouse and vole species. The implications of this change are not yet known. |
| Forest Floor | 1 side forest floor (stay) | Worms eat the litter so very little nutrient stays in this part. |
| 5 sides soil | When worms eat the litter they produce lots of “cast material” (earthworm poop) which becomes part of the soil. The processing that happens in the earthworm gut breaks down the litter in the same way that bacteria & fungi did in the earthworm-free forest floor but they do it a LOT faster so the litter doesn’t accumulate and the nutrients are rapidly converted to forms that can be taken up by plant roots.*(there is no animal link here because the actual amount of nutrient that is in the bodies of the worms is so tiny compared to the amount they convert to soil that it isn’t important. This is an example of how what the worms DO is more important than what they are made of, at least when we are talking about nutrients). | |
| Soil | 1 sides soil (stay) | Some nutrients get bound up with soil particles and stay there. |
| 2 side tree | The fine roots of trees take up nutrients from the soil. | |
| 1 side understory | Now that there is no forest floor, the few plants that can get established root in the soil. | |
| 2 side leach (leave) | When worms eat litter, they convert all of the litter to available forms of nutrients very quickly, the plants can’t take it up as fast as it is being produced so when it rains the water washes those nutrients down deeply into the soil below the plant roots or may wash them out into the adjacent wetlands, creeks & rivers. This process is called “leaching” and it removes the nutrient from this ecosystem. |